Guest Blog
Informative
Introduction to Google Tag Manager
Dec 7, 2018
Informative
Dec 7, 2018
The collection of data through the use of tools such as Google Analytics is absolutely crucial when trying to increase your business’ online reach, turning prospects into customers and optimising your digital marketing strategies in order to develop a strong and lasting relationship with your customers. However, the use of Google Analytics on its own may not always be enough. That’s why Google Tag Manager, in conjunction with Google Analytics, can provide you with the opportunity to collect more and better data than ever before.
"Google Tag Manager is a tag management system that allows you to quickly and easily update tracking codes and related code fragments collectively known as 'tags' on your website or mobile app."
In short, Google Tag Manager allows you to make tag management simpler and more reliable by letting marketers deploy all their website tags in one place. This free tool makes it easy for marketers to add and update website tags such as conversion tracking, site analytics, remarketing, and much more, with just a couple of clicks, and without needing to edit your website’s code.
After adding a small segment of the Tag Manager code to a project, users can easily configure and deploy their tag configurations from a web-based user interface without the need to deploy any additional code. This way, the number of errors can be reduced, whilst eliminating the need of having to involve a developer every time a change is required.
Although Google Tag Manager can become easy to use once you have become accustomed to the platform, it should also not be underestimated as it can get quite technical at times.
So let’s get straight to it.
First, let me start off by naming the three components that the Google Tag Manager consists of: tags, triggers & variables. Let’s briefly run through each of these in order to deepen our understanding of them.

Tags are essentially pieces of JavaScript code that users can place on the backend of their website in order to perform a specific function. These snippets can, later on, be used to either retarget past visitors, track conversions or abandoned carts. Tags can also be used for several different kinds of purposes such as scroll tracking, monitoring lead form submissions, generating heat maps and tracking the manner in which people arrive at your website or mobile app.
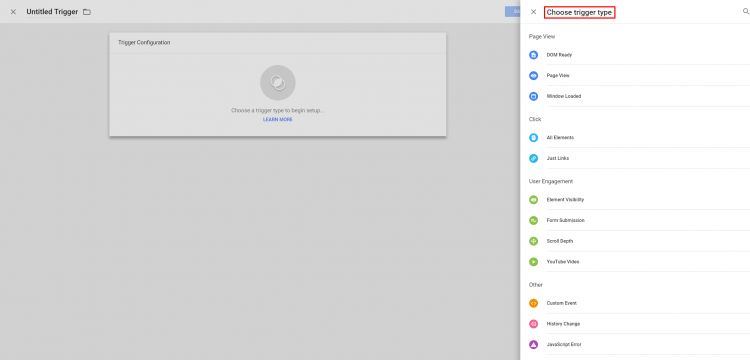
Simply put, a trigger represents when you want a certain tag to be recorded or set into action based on a user’s activity or behaviour on your website or app. For example: “Every time someone visits this page” or “Activate when the scroll depth (A Google Analytics plugin that allows you to measure how far users are scrolling on a page) reaches 60%.”
When setting up a trigger in the GTM, you’ll be presented with a plethora of triggers to choose from, including page views, clicks, form submission, element visibility, history change, scroll depth, timer, JavaScript error, custom events and YouTube video.
It may be interesting to know that triggers can also be employed to work in a reverse effect. That’s because in some situations you may not want a specific tag to be triggered. In this instance, a blocking trigger can be created in order to prevent certain triggers from being activated on specific occasions.
The Google Tag Manager prioritises blocking triggers over the other kinds of triggers. So if, for example, there’s a tag that you have ordered to be activated on all your pages, but there are a few specific pages that you would like to exclude from that list, you can simply place a blocking trigger on it in order to prevent it from affecting those pages.
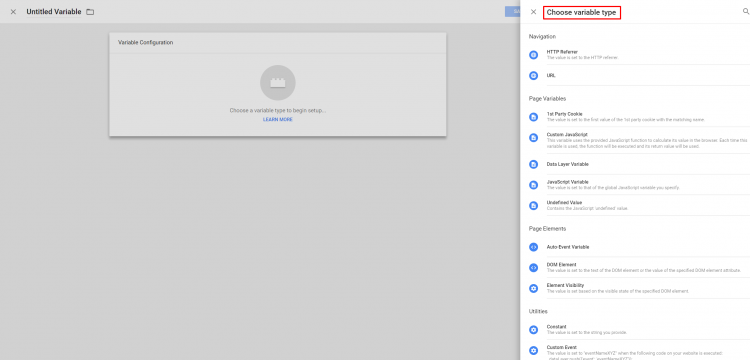
Then we have the variables. These are conditions that offer some more information about a tag before firing. Whilst tags are dependant on triggers, triggers are dependant on variables. That’s because variables contain the value that needs to be evaluated by a trigger in order for it to know whether it should fire or not. Allow me to explain with a brief example.
Allow me to explain with a brief example.
Say you want to activate a remarketing tag every time a visitor spends more than €150 on your website or app. To do so, you’ll have to create a pageview trigger and add the following trigger condition to it: Transaction amount higher than €150.
However, since there is no variable called ‘transaction amount’ you’ll need to add that part and define it. The GTM must then look for the set value of the transaction amount in a JavaScript variable.
The result here is that whenever a user visits and spends money on your website, the Google Tag Manager will calculate whether it is above the set figure of €150. Should that be the case then the remarketing trigger will automatically fire in order to target these past visitors.
Finally, we have the container, which is a grouping of tags, triggers and variables. In a way, containers set the rules for a specific domain. Once you have succeeded in setting up your tags and triggers whilst specifying the variables, you’ll have a fully complete container.
The container will allow you to freely add, update or remove tags for your chosen domain, eliminating the need to constantly return to the back-end of each page.
So now that you have a solid background of information, you’ll be able to proceed with the actual set up of your Google Tag Manager.
After setting up your Google Tag Manager and creating a new account & container, the next step will be installing it.
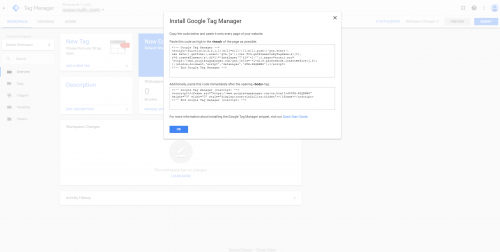
Please follow these steps:
After installing your container, you can start adding tags by following these steps.
In order to add a tag: Click on the “New” button. Then, select the tag type (e.g. Google Ads Conversion Tracking) before specifying triggers for when the tag should fire. If you want to edit a tag, click a tag in the list and make the necessary changes by clicking on “Edit Tag”.
Increase Website Speed: Since GTM makes it so easy to maintain tags, it will also result in making it easier to boost the speed of your website by giving you the ability to the remove the ones you no longer need. Furthermore, GTM loads asynchronously from the web page, meaning web pages don’t have to wait for Google Tag Manager to load before loading all of the content.
Flexibility: GTM allows you to tweak the tags that you create according to your specific needs in order to track the different behaviours exhibited on your website. This can be achieved by simply choosing a tag and picking from pre-set triggers and criteria to determine when it is activated. Alternatively, you can always create your own from scratch.
Mobile Apps: Google Tag Manager doesn’t only work with websites, but mobile apps and Accelerated Mobile Pages (AMP) too.
Track Errors: GTM’s error tracking system combined with the preview mode feature make it much easier for users to pick up on any mistakes or issues before they are set live. This way, the number of human errors can be reduced significantly, preventing costly errors from taking place and causing a crash in the website.
What I have noticed is that there appears to be a bit of confusion about the differences between Google Analytics and Google Tag Manager, with some thinking that one must replace the other. Although they do not necessarily have to be used together, it’s still worth mentioning the potential significance of their combined use.
Therefore, it really is important to understand that Google Tag Manager does not replace Google Analytics. On the contrary, it helps users to easily add Google Analytics tracking codes (or tags) to their website, whilst also playing a role in deploying Google Analytics event code snippets in addition to defining rules about when each tag should fire.
Think of Google Tag Manager as the middleman in the analytics implementation on your website. At the end of the day, it is recommended to use the GTM if you would like to add Google Analytics Tracking code or events as it eradicates the need to constantly apply changes in your website’s code, paving the way for a faster and more efficient deployment.
Google Tag Manager can serve you on different levels. Not only will it save you precious time and eliminate the need for help from your developers, but it can also completely improve your users’ experience in different ways.
The ability to simply to add any software that could in any way, shape or form improve personalisation such as email automation or live chats is one that can play a vital role for you and your company. The added data that you can obtain from this will also help you improve the efficiency and experience on your website. And of course, a website or app supported by the management of JavaScript, leading to improved performance and faster loading time can only result in a better conversion rate for your business. Lastly, let’s not forget that this tool is completely free to use! So why not give it a try!
We know it may take you a bit of time before you get the hang of this, but once you have it will only get easier. If you’re still experiencing some trouble with your Google Tag Manager, check out Google’s Tag Manager Help page for additional instructions and troubleshooting guides.
Have you signed up for our newsletter? If not, don’t forget to subscribe so we can keep updating you with the latest news, blogs, tips, whitepapers and much more!